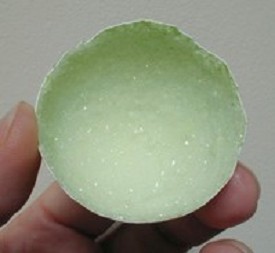
"Geode" in room light
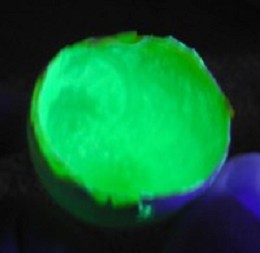
"Geode" under ultraviolet (black) light
by Dr. Kathleen A. Carrado, Argonne National Labs |
Please note: All chemicals and experiments can entail an element of risk, and no experiments should be performed without proper adult supervision.
Kids, this recipe is for a clear slime that glows in the dark after you expose it to light. The main ingredients are: Elmer's glue gel, (saturated) borax solution and glowing paint. Youll also need measuring cups/spoons, a bowl or Ziploc baggie and a spoon.
First, prepare a glue gel solution by mixing 1 part of glue gel (either clear or pale blue) with 3 parts of warm water. Stir the glow agent into the glue gel, about 1/8 teaspoon (tsp) per 30 ml (2 tablespoons, Tbsp) of solution. You can find glowing paint at some paint stores or glowing paint powder (which is zinc sulfide, ZnS) at craft or hobby stores. The paint powder will not dissolve so you just want it mixed in really well.
The other solution you need is a saturated borax solution made by stirring borax into warm water until it stops dissolving, leaving borax at the bottom of the container. Mix together 30 ml (2 Tbsp) glue gel solution with 10 ml (2 tsp) of borax solution. You can use a spoon and a cup or you can just squish it together inside a sealed baggie. The phosphorescent glow is activated by shining a light on the slime. Then you turn out the lights and it will glow!
Tips:
-------------
Reference:
Dr. Anne Marie Helmenstine at
http://chemistry.about.com/od/chemistryhowtoguide/ht/glowindarkslime.htm
Kids, how can you make a geode glow in the dark? It's very easy in this experiment. The 'rock' is a natural mineral (in this case an eggshell). You can use one of several common household chemicals to grow the crystals. And the glow comes from paint that you can get from a craft store.
To Prepare the Rock:
To Make the Crystal Solution:
To Grow the Crystals:
Note: Take appropriate safety cautions when handling the crystal solutions.
|
|
|---|---|
"Geode" in room light |
"Geode" under ultraviolet (black) light |
-------------
Reference:
Dr. Anne Marie Helmenstine at
http://chemistry.about.com/b/2007/12/09/glow-in-the-dark-geode.htm
Kids, what’s up with those little cellophane packets of powder that come with cut flowers? They have three components:
Food: Sugar is needed to continue development of a bud into a flower, and the flower will perform better in terms of size, color and vase life.
Hydration: A wilted flower is one where the cells do not have their full amount of water. The outside ring of the stem is made up of tiny tubes or vessels. This group of vessels transports water from the roots (or vase) to the leaves and flowers. When a flower dehydrates through harvest and shipping, the chemistry needs a jumpstart. Agents that lower the solution pH encourage hydration. This is normally a mild acid such as citric acid.
Antibacterial: The water in the vase can quickly become bacteria soup. All it takes is a few stray pieces of plant tissue and some latent bacteria. Bacteria in the water will form plugs in the stem of the flower, blocking the water from flowing through the stem of the flower. The preservative contains an antibacterial agent to stop this from happening.
Most packets contain 5 grams and make one pint of solution. Average vases hold at least one quart of water, however. Use too little and there is not enough antibacterial agent and you’ve got a recipe for cloudy, smelly water. The solution is to make your own at home!
Tulips are a good flower to test plain water versus a preservative (either commercial or homemade). Use the same number of flowers per container, the same size container, and the same volume of liquid. Use warm water (100-110°F or 38-40°C) because it will move into the stems better than cold water. Tap water is fine; in fact the chlorine in tap water acts as a natural disinfectant. Have an adult partner handle the bleach in these recipes:
Recipe #1
• 2 cups lemon-lime soda (e.g., Sprite™ or 7-Up™)
• 1/2 teaspoon household chlorine bleach
• 2 cups warm water
Recipe #2
• 2 tablespoons fresh lemon juice
• 1 tablespoon sugar
• 1/2 teaspoon household chlorine bleach
• 1 quart warm water
Recipe #3
• 2 tablespoons white vinegar
• 2 tablespoons sugar
• 1/2 teaspoon household chlorine bleach
• 1 quart warm water
Which ingredient acts as the food, the hydrating acid, and the antibacterial agent in each recipe? We have even found websites advocating the use of Listerine™ mouthwash because it contains all of these ingredients! (e.g. <http://ars.org/About_Roses/conditioning_noble.html>)
-------------
Reference:
Ann Marie Helmenstine at <http://chemistry.about.com/od/chemistryhowtoguide/a/cutflowers.htm>
and
Karen Marinelli at <http://ezinearticles.com/?Fresh-Cut-Flower-Preservative-Packets&id=81863>
Kids, why does shaking a can of soda make it burst out when you open it? And does tapping on the can stop it from doing this?
Contrary to popular belief, shaking a can of soda does not increase the pressure inside the can. Shaking takes one single pocket of carbon dioxide gas at the top of the can and changes it into thousands of tiny bubbles distributed throughout the entire can. This causes a huge increase in the surface area, so there are more places for the carbon dioxide to dissolve and bubble.
In an unshaken can, bubbling out happens at the liquids surface, but it can also happen anywhere along the inside walls of the can where there is some tiny bumpalso called a nucleation sitethat can help bubbles to form. For this reason, bottling companies make sure that the inside walls of their cans are as smooth as possible. Otherwise, soda would spray all over the place each time a can is opened.
When a can is shaken and then opened, not only is there a great deal more surface area, but each tiny bubble can act as a nucleation site. This causes a rapid bubbling out of carbon dioxide all throughout the liquid, not just at the top. Voilá - a soda explosion.
Now, does tapping on the top of the can stop it from exploding? The theory is that tapping loosens tiny bubbles stuck on the sides, which are nucleation sites; they float to the top and no longer pose a soda explosion threat. Ask an adult partner to confirm it (over a sink!): shake a can of soda at room temperature for five seconds, open it, and watch soda spray fizz out. Then shake an identical can of soda at room temperature for 5 seconds, tap it 10 times, open it, and much less soda should squirt out.
But is this really a well-controlled experiment? Aside from tapping vs. not tapping, the time delay between shaking and opening the can may also make a difference. Now have your adult partner shake two identical cansone in each handfor five seconds, set them down and tap just one of them for five seconds. Then open them at the exact same time. Others report trying this experiment with a variety of sodas for a variety of shaking times and delay times, and are unable to observe any consistent difference between the tapped can and the control. No, it wasnt Mythbusters, but this is similar to many of the urban legends that they disprove!
-------------
Reference:
Bob Becker in ChemMatters at http://www.acs.org/chemmatters February 2008 issue (big file, may load very slowly).
Also see other sites such as: http://www.snopes.com/science/sodacan.asp
Kids, what is the most popular chart used by chemists? Elements are the building blocks of all matter, and currently there are about 117 different and unique atoms comprising the elements. There are many ways to arrange the chemical elements into a chart. Mendeleev arranged rows and columns so that elements were grouped according to recurring (periodic) common properties. Mendeleev's table forms the basis for the modern periodic table of the elements, which lists the elements in order of increasing atomic number while grouping them according to periodic properties. But there isn't just 'one' modern periodic table of the elements. Unless you want a table that is impossible to read, there is a limit to the facts provided on each table. Plus, there is more than one way to group the elements. That's why you'll find more than one periodic table of the elements here:
Clickable Periodic Table of the Elements ( http://chemistry.about.com/library/blperiodictable.htm ). Anne Marie Helmenstine has a favorite at about.com: Chemistry. You can tell at a glance whether an element is a metal or nonmetal, get its atomic number, determine its usual valence, and click on a symbol for detailed facts; there are also extra links provided. Other common variants can be found with simple internet searches; a nice one that is particular to our age group is: http://www.chem4kids.com/files/elem_intro.html
Printable Periodic Tables ( http://chemistry.about.com/od/periodictableelements/a/printperiodic.htm ). This is a collection of several different versions of the periodic table to save or print.
Periodic Table Image Gallery ( http://chemistry.about.com/od/periodictables/ig/Periodic-Tables/ ). This link has Mendeleev’s original as well as variations like circular and spiral tables.
Groups of Elements Periodic Table ( http://chemistry.about.com/library/weekly/blgroups.htm ). If you click a link on this table you get information about the group to which the element belongs.
Fireworks Periodic Table ( http://chemistry.about.com/library/weekly/blfireworks.htm ). Clicking an element will tell you how it is used in fireworks and other pyrotechnic devices.
Periodic Table sorted by Abundance: In the June 1998 column of ChemShorts for Kids we gave the reference to our article on an activity using the periodic table sorted by abundance on the Earth’s surface: http://membership.acs.org/c/chicago/ChmShort/CS98.html#6.98Kids, how can you send an invisible message? Some science projects don't require any chemicals that you don't already have around the house, and a great example is invisible ink.
You use the ink by writing your message with it using a cotton swab, dampened finger, or toothpick. Let the message dry. To be extra sneaky, you may want to write a normal message on the paper so that it doesn't appear to be blank and meaningless. If you do write a cover message, use a ballpoint pen, pencil, or crayon (fountain pen ink could run into your invisible ink). Dont use lined paper for the same reason.
Most invisible inks are made visible by heating the paper. Some messages are developed by spraying or wiping the paper with a second chemical; others are revealed by ultraviolet light.
Examples of common invisible inks are: any acidic fruit juice (e.g., lemon, apple, or orange juice), onion juice, baking soda (sodium bicarbonate), vinegar (acetic acid), white wine, dilute cola, dilute honey, milk, soapy water, and sucrose (table sugar) solution. Here is just one example:
Tips:
1. If you are using the heating method, avoid igniting the paper - don't use a halogen bulb. 2. A cotton swab makes an excellent disposable 'paintbrush'. 3. Baking soda and grape juice react with each other in an acid-base reaction, producing a color change in the paper. 4. The writing turns brown because the weakened paper burns before the rest of the paper. Be careful not to overdo your heating and ignite the paper!
-------------
Reference: Anne Marie Helmenstine on her April 27, 2008 blog at http://chemistry.about.com/.
See these links for baking soda and lemon juice “inks”: http://chemistry.about.com/cs/howtos/ht/invisibleink2.htm and http://chemistry.about.com/cs/howtos/ht/invisibleink3.htm .
An ice cream soda or ice cream float is made by adding soda pop or seltzer to ice cream. Some people add flavoring, like chocolate syrup, or a little milk. However you make it, as soon as the soda hits the ice cream you get fizzy, frothy, tasty bubbles.
Do you know how it works? It's basically the same as what is going on with the Mentos soda fountain (see Mentos Mayhem September 2004 ChemShorts), except not as messy. You are releasing the carbon dioxide in the soda out of solution. Bubbles of air in the ice cream provide nucleation sites around which carbon dioxide bubbles can form and grow. Some ingredients in the ice cream lower the surface tension of the soda so the gas bubbles can expand, while other ingredients trap the bubbles in much the same way as small amounts of protein in seawater trap air to form seafoam.
Very popular varieties include black cows (cola and vanilla ice cream), brown cows (root beer and vanilla ice cream), and a coffee cola float (which is both bubbly and caffeinated). For kids, purple cows are also a big hit they are both frothy and leave a purple tongue and mustache a double win.
A Purple Cow has purple grape juice and milk and/or milk products. Here's a few versions; take your choice.
-------------
Reference: Anne Marie Helmenstine at: http://chemistry.about.com/b/2008/06/23/how-an-ice-cream-soda-or-float-works.htm
and http://sneakykitchen.com/Recipes/purple_cow.htm
Kids, when you’re ready to play your favorite sport do you consider what you’re wearing? Cotton clothes get wet, sticky, and heavy because they hold onto sweat. New high-tech fabrics are different – they pull moisture away from you and through the fabric where it evaporates quickly – and cool you off. Here you’ll compare evaporation rates for cotton and a paper towel as the stand-in for a high-tech material.
Cut two pieces each of 3” x 3” brown paper towels and cotton fabric swatches. Fill a small glass half-full with water. Mark two quart-size Ziploc bags as “room temp water” and two others as “hot water”. Add 1 cup of room temp and hot water to each appropriate bag (have an adult partner handle the hot water). Get as much air out as possible then zip closed and lay flat.
Use an eyedropper to squirt one drop of water from the glass on the center of each towel and fabric square. Try to do this quickly so that they each get their drop at about the same time. Let the drops spread for about 15 seconds until they stop spreading. Place one towel and one fabric swatch each on top of the “room temp” and “hot water” baggies. Observe every three minutes and compare the amount of water on each spot. Record your results. What do you observe? The paper towel should have much larger pores than the cotton fabric, and it behaves like the high-tech fabrics would in this test.
Where’s the chemistry? High-tech fabrics in modern sports clothes have pores to move water away from the skin and to the outer surface of the fabric. These pores provide a way for sweat to evaporate faster, keeping you dry and comfortable. Evaporation happens when water is heated and goes into the air. It takes energy to evaporate water. Heat is a form of energy, and water evaporates more quickly at warmer temperatures. Materials that soak up water (like cotton) hold onto it longer due to a slower evaporation rate. Materials with pores allow faster evaporation, like those used in high-tech clothing. Check out triathlon suits (“trisuits”) as just one example.
-------------
Reference:
National Chemistry Week is October 19-25, 2008. The theme this year is “Having a Ball With Chemistry” and is all about the chemistry of sports. The American Chemical Society has published a newspaper called “Celebrating Chemistry” for National Chemistry Week that contains several activities, one of which is called “Evaporation Exploration” and used for this article. The editor is Judith Jankowski. See www.acs.org, click on Education, and look for the Community Outreach section. Or inquire at ACS, 1155 16th St. NW, Washington, DC 20036.
Kids, it's easy to make your own weather barometer! Using simple instruments, people predicted weather back in the good ole days before Doppler radar and GOES satellites. One of the most useful instruments is a barometer, which measures air pressure or barometric pressure. You can make your own barometer using everyday materials and then try to forecast the weather yourself.
Youll need a glass, jar, or can, plastic wrap, a straw, a rubber band, an index card or lined notebook paper, tape, and scissors. To make the barometer:
How does it work? High atmospheric pressure pushes on the plastic wrap, causing it to cave in. The plastic and the taped section of straw sink, causing the end of the straw to tilt up. When atmospheric pressure is low, the pressure of the air inside the can is higher. The plastic wrap bulges out, raising the taped end of the straw. The edge of the straw falls until it comes to rest against the rim of the container. Temperature also affects atmospheric pressure so your barometer needs a constant temperature in order to be accurate. Keep it away from a window or other places that experience temperature changes.
So how do you predict the weather? Weather patterns have regions of high and low atmospheric pressure. Rising pressure means dry, cool, and calm weather. Dropping pressure forecasts rain, wind, and storms.
-------------
Reference: Anne Marie Helmenstine at: http://chemistry.about.com/b/2008/09/06/make-a-simple-weather-barometer.htm?nl=1
Kids, what could make a piece of soap change to a ball of foam without using any liquid? Small pieces of Ivory soap, when microwaved, will expand into a foam that is more than six times their original size! It's a fun trick that won't hurt either your microwave or the soap. The causes are from closed-cell foam formation, physical change, and Charles' Law.
To try it yourself youll need a bar of Ivory soap, a paper plate or microwave-safe dish, and a microwave oven. Unwrap a bar of Ivory soap and have an adult partner break it into small pieces. Place a small piece on a paper plate. Microwave your soap at normal power and watch to see what happens. Depending on microwave power, the soap will reach maximum volume within 30 seconds to 2 minutes depending on the size of the pieces. If you microwave the soap longer nothing bad will happen, but the soap won't continue to grow. Allow the soap to cool for two minutes before handling. It may feel brittle and flaky but it's still soap, with the same cleaning power as before. Go ahead and get it wet and you'll see it lathers the same as ever.
Whats happening? A foam is a material that traps a gas inside a cell-like structure. Examples include shaving cream, whipped cream, Styrofoam, and even bone. Foams can be fluid or solid, squishy or rigid.
Two processes occur here. First, heating the soap softens it. Second, you are heating the air and water trapped inside the soap, causing the water to vaporize and the air to expand. The expanding gases push on the softened soap, causing it to expand and become a foam. Popping popcorn works in much the same way. The appearance of the soap is changed, but no chemical reaction occurs. This is an example of a physical change. It also demonstrates Charles' Law, which states the volume of a gas increases with its temperature. The microwaves impart energy into the soap, water, and air molecules, causing them to move faster and further away from each other. The result is that the soap puffs up. Other brands of soap don't contain as much whipped air and simply melt in the microwave.
Other Things to Try. (a) Cut a piece of Ivory and examine it. Do you see pockets of air? The air that causes Ivory to be less dense than water has been whipped into the soap. So you won't actually see bubbles or pockets of air with your eyes but this is the reason why the soap trick works. (b) Try microwaving other brands of soap. (c) Place a bar of Ivory in a bowl of water. Does it float? Try this with other brands of soap. Do they float or sink?
-------------
Reference: Dr. Anne Marie Helmenstine at: http://chemistry.about.com/od/demonstrationsexperiments/a/soaptrick.htm