by Dr. Kathleen A. Carrado, Argonne National Labs |
Please note: All chemicals and experiments can entail an element of risk, and no experiments should be performed without proper adult supervision.
Safety Tips * Dry ice is very cold so don't touch or eat it; leave all handling to an adult partner who should wear non-plastic gloves and use tongs. * Don't ever seal dry ice into a closed container. * Freshly frozen fizzy fruit is the same temperature as dry ice (around -109°F) so allow it to warm a bit before consuming it. |
|---|
Kids, what could make pieces of fruit act like fizzy ice cubes? Carbon dioxide! Using dry ice, which is the solid form of CO2, fruit can be filled with tingly carbon dioxide bubbles, like a soda. All you need for this is dry ice, fruit, and a plastic bowl.
What’s going on? Sublimation is a transition directly from the solid phase to gas phase without going through a liquid stage. Vaporization, on the other hand, is a phase transition from the liquid phase to gas phase, and includes both evaporation and boiling.
Tip: Some Meijer stores sell dry ice behind their counters, and you can try some ice cream stores for their supply. In the Chicago area you can also check http://www.solidco2.com and http://www.langice.com.
-------------
Reference: Dr. Anne Marie Helmenstine at: http://chemistry.about.com/od/ediblescienceprojects/a/carbonatedfruit.htm?nl=1
Kids, how can adding something purple to something white make something green? Red cabbage juice contains a natural pH indicator that changes color from purple to green under basic (alkaline) conditions. You can use this reaction to make a fried green egg. First, with the help of an adult partner, prepare the red cabbage pH indicator. 1. Coarsely chop about a half cup of red cabbage. 2. Microwave the cabbage in a bowl until it is soft (about 4 minutes). 3. Allow the cabbage to cool in the bowl. 4. When cool, collect the juice in a cup. You can get more juice by wrapping the cabbage in a coffee filter or paper towel and squeezing.
Now, have your adult partner fry an egg. 1. Spray a pan with cooking spray. Heat the pan over medium-high heat. 2. Crack an egg and separate the egg white from the yolk. Set the yolk aside. 3. In a small bowl, mix the egg white with a small amount of red cabbage juice. Did you see the color change? The more you mix, the more uniform the green color will be. 4. Add the egg white mixture to the hot pan. Set the egg yolk in the middle of the egg. Fry it and eat it like you would any other egg. Yum!
Here is how it works. The pigments in red cabbage are called anthocyanins. These pigments change color in response to changes in pH, which is a measure of how acidic or basic something is. Red cabbage juice is purplish-red under acidic conditions (pH less than 7), but changes to a blue-green color under alkaline conditions (pH greater than 7). Egg whites are alkaline (pH ~9) so when you mix the red cabbage juice into the egg white the pigment changes color. The pH does not change as the egg is cooked so the color is stable. It's also edible, so you can eat the fruits of your labor!
-------------
References: Dr. Anne Marie Helmenstine at http://chemistry.about.com/od/chemistryhowtoguide/a/friedgreenegg.htm.
For a video see http://www.metacafe.com/watch/938777/green_egg_trick/
Kids, let’s pop colored bubbles onto a piece of paper to make bubble prints. Bubble prints are like fingerprints except made with bubbles. You can make bubble prints and learn about how bubbles are shaped and how pigments combine to make different colors.
Bubble prints are made by adding color to a bubble solution, blowing bubbles, and pressing paper onto the bubbles. You need brightly-colored bubbles in order to get a good picture. Tempera paint powder works really well, but you can substitute other water-soluble paints if you like. Here’s everything you need: bubble solution (buy it or make your own), tempera paint powder, white paper, straws, and some small plates.
First make your colored bubble solution. Pour a little bubble solution into a plate. Stir in paint powder until you have a thick paint. You want the thickest paint you can get, yet still able to make bubbles from it. If you get the three primary colors of tempera paint then you can mix them in order to make other colors. You can add black or white paint, too.
Make Bubble Prints
Learn About Bubbles
Bubbles consist of a thin film of soapy water filled with air. When you blow a bubble, the film expands outward. The forces acting cause it to form the shape that encloses the most volume with the least surface area -- a sphere. Look at the bubble prints that you have made. When bubbles stack, do they remain spheres? Probably not, because when two bubbles meet they will merge their walls to minimize their surface area. If bubbles that are the same size meet, then the wall that separates them will be flat. If bubbles that are different sizes meet, then the smaller bubble will bulge into the large bubble. Bubbles meet to form walls at an angle of 120°. If enough bubbles meet, the cells will form hexagons. Can you can see this structure in the images you’ve made?
-------------
References: Dr. Anne Marie Helmenstine at http://chemistry.about.com/od/bubbles/a/bubbleprints.htm
Kids, how can you make a bubble as big as a crystal ball and filled with a smoky haze? All you need to make such a large bubble is dry ice, bubble solution, and a little water. Dry ice sublimes to form carbon dioxide gas, which in turn is used to form and expand the bubble.
The supplies you will need are dry ice, a bubble solution, water, and a glass or small glass bowl. To make the bubble: (a) pour some water into the container; (b) have an adult partner add a small piece or two of dry ice using tongs. The dry ice will make bubbles in the liquid; (c) spread a film of bubble solution around the lip of the container; (d) your adult partner can then carefully use their wet, soapy hand or a piece of paper towel that has been wetted with bubble solution to smear bubble solution across the top of the container. (There is a video provided within the link below so you can see how it’s done).
Variations: (1) adding a little highlighter ink to the bubble solution will make the bubble solution glow. (2) Use tonic water instead of regular water and shine a black light (UV light) on the bubble; the quinine molecules in the tonic water will glow (“fluoresce”).
How It Works
Dry ice sublimes in air, meaning the solid carbon dioxide goes through a phase change to carbon dioxide gas. This process occurs much more quickly in water than in air. As the dry ice sublimes, the carbon dioxide vapor is caught inside the bubble solution. The bubble expands, but the cooled bubble solution does not evaporate quickly so the bubble lasts for a relatively long time.
Sometimes conditions are right for the bubble to stabilize at a given size. This happens because carbon dioxide is able to diffuse across the bubble surface. Subliming carbon dioxide expands the bubble, but when the bubble expands its walls become thinner and leak more. Since more carbon dioxide can escape, the pressure is reduced and the bubble has a tendency to shrink back again. As long as the solution doesn't evaporate too quickly, the bubble may remain relatively stable until the dry ice is nearly gone. At that point the bubble will become smaller.
-------------
References: Dr. Anne Marie Helmenstine at http://chemistry.about.com/od/dryiceprojects/a/dryicebubble.htm
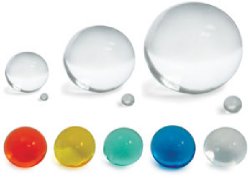
Kids, how can you make crystals and spheres disappear? Start with ones that are made from polyacrylamide! Superabsorbent polyacrylamide crystals (e.g. Soil Moist Crystals®, among other brands) are small grains which, when placed in water, seem to disappear. To your friends, you can cast an “invisibility spell” on the small crystals to make them grow and disappear in a glass of water. Small spheres made of the crosslinked polyacrylamide polymer are also available.
Place the hard crystals in a glass or bowl about ¼ full, add water, and they can expand by up to 300 times, producing gel-like spheres that are slippery (and safe) to the touch. These are extraordinary volume increases. Crystals starting with a diameter of about 3 mm end with a diameter of about 20 mm. From a volume perspective, spheres can expand from 113 mm3 to 33,512 mm3, which is more than 29000%. Determine the change in volume yourself using V = 4/3 π(r)3. 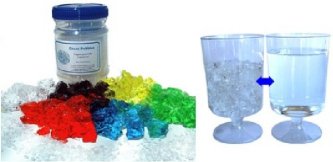
The wet crystals and spheres can be dyed using food coloring, then dried out and reused. Put them in the sun and they will become rock-hard again. For some other variations, tie a loop of yarn around one of the beads. When submerged in a glass of water, the bead disappears and the yarn forms a (seemingly empty) circle in the water. Lifting the yarn out of the water results in the previously invisible bead magically appearing as it rises above the water. From a biology or earth science perspective, this is a great way for starting seeds and growing plants so that the roots can be seen.
What’s happening? Light changes its speed when it passes into an optical medium of different density. This causes the light rays to bend (refract). Crystals and spheres refract light when it enters and leaves them. Furthermore, the various planes of the crystals scatter the refracted light at different angles. When left in water, the fully gelled super absorbent crystals contain up to 95% water, so they have the same optical density as water. This minimizes refraction when submerged in water and the crystals and spheres become invisible.
Polyacrylamide crystals and spheres can be purchased from science supply companies, or from garden shops, where they are used to uniformly provide water to plant roots over watering/drying cycles.
-------------
References: ACS ChemMatters February 2009, Teacher’s Guide (Item #2 of “Demonstrations & Lessons” from “Science at Hogwarts: Chemistry in Harry Potter’s World” by Jane Snell Copes).
“Growing Spheres” at http://www.teachersource.com.
Carl Ahlers - Prof Bunsen Science; http://www.profbunsen.com.au/
Kids, learn how to use a special color-changing paper to develop a hidden message! Certain brands of goldenrod (golden yellow) paper contain a special dye that turns bright red in solutions that are basic like ammonia or baking soda. The paper turns back yellow with an acid like vinegar or lemon juice.
You will need some sheets of goldenrod paper (available on-line at several sites or craft stores), cotton balls, household ammonia from the grocery store, safety glasses, and a candle.
1. Place a piece of goldenrod paper on the table. Make sure that table is clean and the work surface is dry.
2. Place a drop of water on one of the corners of the paper. Does anything happen?
3. Fill a jar with a small amount of ammonia water. Dip in a cotton ball and wipe it across the top portion of the goldenrod paper. Does anything happen?
4. As you continue to wipe designs on the top half of the goldenrod paper, notice that the paper does not stay red forever. What is causing the paper to change back to yellow?
5. Use the old piece of wax candle to write a secret message (such as “Chemistry is Cool!”) across the bottom half of the paper.
6. Wipe the cotton ball with ammonia water across the secret message to see what develops.
How does it work?
Goldenrod paper's yellow color is from a dye that is found in turmeric powder, a deep orange-yellow spice. Turmeric contains 5% essential oils and 3% curcumin (another name for turmeric is curry). It is the active substance of turmeric and it is also known as Natural Yellow 3; the full chemical name is (hang on!): (1E,6E)-1,7-bis(4-hydroxy-3-methoxyphenyl)-1,6-heptadiene-3,5-dione (a polyphenol).
The ammonia on the cotton ball is a base and causes the dye in the special goldenrod paper to change color. You probably noticed that the red color fades over time and the paper eventually changes back to its original yellow color. Why? Carbon dioxide in the air reacts with ammonium hydroxide to make ammonium carbonate, which is neutral. If you use a stronger base like baking soda, the red message will not disappear in air. You will need to use a stronger acid like lemon juice or vinegar to change it from red to yellow. You can also use goldenrod paper as inexpensive pH paper to classify safe household products as being either acidic or basic.
-------------
References: http://www.stevespanglerscience.com (search “goldenrod”); this link also has a video.
Carl Ahlers - Prof Bunsen Science (www.profbunsen.com.au)
This is a quick and easy crystal growing project. All you need is a bit of table salt, water, a steel pan, and a stove to produce interesting salt crystal rings, ferns, and other shapes. Specifically, get these materials together along with an adult partner:
Now just sprinkle a little salt in the pot and a few drops of water. You can add a drop of food coloring if you want colored crystals. Have an adult partner heat the water until you see the liquid starting to evaporate off the pan. Turn off the heat. Watch the crystals form as the water evaporates to form artful crystal shapes like rings and ferns. You can add more water and repeat the project over and over. All you do for clean-up is rinse out the pan.
There are many variables to this experiment that you can examine, such as:
Notes: The best results are obtained when using a very small amount of salt. We’re told that a fern shape can sometimes occur from boiling salted pasta. If you use uniodized salt, you may get salt crystal cubes rather than rings. More complex shapes occur with sea salt and aquarium salt. Other salts will work for this project too (e.g., borax, epsom salts). Sugar is not a good choice because it will burn and possibly ruin your cookware.
-------------
References: Dr.
Anne Marie Helmenstine at http://chemistry.about.com/od/crystalrecipes/a/saltcrystalring.htm?nl=1
Kids, here is a chance to use the scientific phenomenon of density and make a “magic trick”. Take two glasses of different-colored liquids and watch the liquids switch places in the glasses!
For liquid materials, you need water and another liquid with a different density. If the liquids don't mix at all (such as water and oil), you will get a clearly-defined separation. If you use rubbing alcohol (isopropyl alcohol or isopropanol) or an alcoholic beverage (ethanol) with water then there will some mixing and the separation won’t be so clear. You’ll also need two small identical glasses (shot glasses work well) and a thin waterproof card, such as a driver's license or a thick plastic playing card of some type.
Here is what you do:
How
it works:
You could do this as a magic trick but really it is simple science.
The two liquids have different densities and so the lighter liquid will float
while the heavier liquid will sink. The result is the same if you remove
the card entirely and quickly but this way it is easier to observe the change
as it slowly evolves.
-------------
References: Dr. Anne Marie Helmenstine at http://chemistry.about.com/od/chemistrymagic/a/liquid-science-magic-trick.htm
 Kids, every time someone writes a line with a pencil, the resulting mark includes
bits of the hottest new material in chemistry and nanotechnology: graphene.
What do graphite, diamond, and fullerene (aka buckyball) have in common? They
are all made of pure carbon! In chemistry terms they are called “allotropes”.
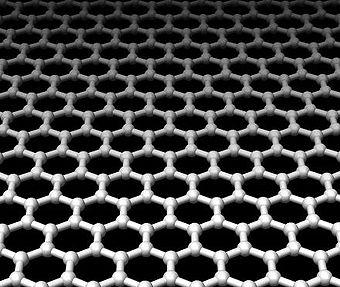
And now the latest addition to the family is graphene. Graphene is a single
carbon sheet that is one atom thick where the carbon atoms are bonded to each
other in a network of repeating hexagons to form a honeycomb array. Believe
it or not, the film is stronger than diamond. And it conducts electricity about
100 times better than silicon. These properties make graphene the thinnest
material out there, in addition to the strongest.
Kids, every time someone writes a line with a pencil, the resulting mark includes
bits of the hottest new material in chemistry and nanotechnology: graphene.
What do graphite, diamond, and fullerene (aka buckyball) have in common? They
are all made of pure carbon! In chemistry terms they are called “allotropes”.
And now the latest addition to the family is graphene. Graphene is a single
carbon sheet that is one atom thick where the carbon atoms are bonded to each
other in a network of repeating hexagons to form a honeycomb array. Believe
it or not, the film is stronger than diamond. And it conducts electricity about
100 times better than silicon. These properties make graphene the thinnest
material out there, in addition to the strongest.
Graphene comes from graphite, the “lead” in a pencil: a kind of pure carbon formed from flat, stacked layers of atoms. The layered structure of graphite has been known for many years. Graphene is the name given to one sheet of graphite.
Researchers can split graphite crystals into progressively thinner wafers by scraping or rubbing them against another surface. This is called “micromechanical cleavage”. They simply stick a flake of graphite onto plastic adhesive tape, fold the sticky side of the tape over the flake and then pull the tape apart, cleaving the flake in two. As the process is repeated, the resulting fragments grow thinner and thinner until they are only one atom thick. They have high crystal quality and are chemically stable.
We encourage you to watch a YouTube video, “Making Graphene 101, Ozyilmaz' Group” at http://www.youtube.com/watch?v=rphiCdR68TE and try this yourself with an adult partner. As a less involved experiment, just use the side of a pencil tip to fill in an area about 2” square on a sheet of paper, then use adhesive tape on the markings. Use another piece of tape to peel off more from the tape, repeat, and observe what is lifted up.
Commercial applications may be on the way, now that newer methods have been developed that involve etching the carbon away from a silicon, copper, or nickel base. Potential uses include cell phones, touch screens, solar cells, and other energy storage and electronic applications.
-------------
References:
http://chemistry.about.com/b/2009/07/12/have-you-heard-about-graphene.htm and
April 2008 Scientific American Magazine, “Carbon Wonderland” by Andre K. Geim and Philip Kim.
Kids, did you ever think of freezing a whole peach or even one cut up into pieces? Why not? If you tried it, you'd find that all of the flavor was gone and that the perfectly peachy texture became mush upon thawing. So what can be done to save peaches beyond their growing season?
First, let's demonstrate why simply freezing a peeled and diced peach is a bad idea. Fill a plastic zip-top bag with water and seal shut. Have an adult partner find a pointy object such as a knitting needle. Imagine that the bag filled with water is a pulp cell inside the peach. Imagine that the needle is an ice crystal. Holding the bag over a sink, have your adult partner puncture the bag several times making holes for the water to leak out. This is what happens when ice crystals puncture pulp cells during the freezing process.
What scientific trick can be used to prevent this? The substance that we call sugar is actually sucrose, a disaccharide, or double sugar. Sucrose is famous for being hygroscopic, meaning that it loves to grab hold of water at the molecular level. By adding some sucrose to diced peaches, some of the water is pulled out of the peaches and creates a syrup with the sucrose. The trick is that when the syrup freezes, the sucrose holds onto some of the water, and that prevents the ice crystals from getting so big that they poke holes in all the cells, which makes all of the moisture leak out when the peaches thaw.
For one pound of diced peaches which you would like to freeze, add about ½ cup of sugar. Before doing that, however, be aware that neither sucrose nor freezing temperatures will stop peaches from turning brown. For that, more science is needed, in the form of an acid. Since browning is really an oxidative process, what's needed is an antioxidant. Ascorbic acid, which is good old vitamin C, works well for this. About 500 milligrams (mg) will do. Crush up a vitamin C tablet between two spoons, dissolve it in 3 tablespoons of water, and mix into the peaches before the sugar.
Once the peaches, vitamin C, and sucrose are mixed, let the mixture sit for 15 minutes until a thick syrup forms. Transfer the peach mixture to zip-top freezer bags for long-term storage. Enjoy your kitchen chemistry all winter long!
-------------
References: Alton Brown of the "Good
Eats" TV show on The Food Network: http://www.goodeatsfanpage.com/Season10/peaches/peachy_keen_tran.htm
Updated 11/3/09