 Rochelle salt is also called potassium sodium tartrate with the molecular formula of KNaC4H4O6•4H2O. Unless your adult partner works in a lab, you probably don't have this chemical lying around. But you can make it in your own kitchen!
by Kathleen Carrado Gregar, PhD, Argonne National Labs |
Please note: All chemicals and experiments can entail an element of risk, and no experiments should be performed without proper adult supervision.
Kids, did you ever wonder why the snow in movies never seems to melt? You too can make a version of fake “Hollywood” snow using a common polymer. The fake snow is non-toxic, feels cool to the touch, lasts for days, and looks similar to the real thing. All you need is water and the polymer called sodium polyacrylate.
Procedure:
Tips:
-------------
References:
Anne Marie Helmenstine at About.com: Chemistry
http://chemistry.about.com/od/chemistryhowtoguide/ht/fakesnow.htm
http://chemistry.about.com/od/howthingsworkfaqs/f/diapers.htm
Kids, what kind of trash bag breaks down fastest? As you probably know, trash is a weighty (pun intended) topic in this country. With only so much landfill space available, chemists and environmentalists are looking to other means of disposing trash. Most of the plastic bags in landfills are not environmentally friendly because they take many years to completely degrade.
In this experiment the biodegradability of several plastic bags, brown paper bags, and newspaper are tested in different environmental conditions: direct sunlight, a mulch pile (to simulate an ‘active’ landfill), a leaf pile (to simulate a dry landfill), in tap water (to simulate a lake), and in saltwater (to simulate an ocean). You’ll have to plan ahead because results take at least three months. Also get an okay from your parent or guardian before starting. Trust me, adults will not be amused to come home and find that you've begun this without their knowledge. Besides you may need their help.
http://www.infoplease.com/cig/science-fair-projects/kind-trash-bag-breaks-down-fastest.html
Excerpted from The Complete Idiot's Guide to Science Fair Projects © 2003 by Nancy K. O'Leary and Susan Shelly. Alpha Books, Penguin Group (USA) Inc.
http://www.biodegradableplasticbags.org/
http://www.education.com/science-fair/article/biodegrade-plastic-paper-newspaper/
Kids, have you seen those drinks with the floating edible eggs or beads in them? You can apply chemistry to make edible eggs or beads, and you can even make them change color.
Use a slotted spoon or strainer to remove a spoonful of the gel eggs. Add them to an acidic drink, like lemonade or lemon-lime soda or white wine and watch the acidity of the drink change the color of the eggs from blue to red! A carbonated beverage is extra fun because the gel eggs will float up and down with the bubbles.
Supplies: Sodium alginate can be found in grocery and health food stores. Frozen, concentrated, deeply-colored grape juice is best; bottled concentrate is ok. Calcium chloride is at grocery stores where the pickling and canning chemicals are sold, or from home supply stores in the dessicant area.
-------------
References:
Anne Marie Helmenstine at About.com: Chemistry
http://chemistry.about.com/b/2012/01/06/color-change-gel-eggs-food-chemistry-project.htm
Kids, did you know that you don't always need a wick and wax to make a candle? All you need for this alternative is a clementine and some olive oil. The clementine acts as a natural wick for the oil. A candle works by vaporizing wax or oil by burning, via a chemical reaction that produces water and carbon dioxide from oxygen and the carbon-based oil. It's a clean process that also yields heat and light.
You’ll need:
Cut the clementine in half and carefully peel away the fruit, leaving ALL of the white part, called the pericarp or albedo, intact and exposed. This includes the edges near the rind AND the center piece. The pericarp consists primarily of pectin, which is a plant polymer like the cellulose you would find in an ordinary candle wick. The pericarp, by the way, is high in vitamin C. Your goal is to have half of the fruit peel intact, and dry. If you made a mess with the juice, dry your rind off. Once the rind is prepared, pour a small amount of olive oil into the "candle." It really doesn't take very much, plus you want the "wick" to remain well exposed and not drowned in oil.
Have an adult partner light the candle. It might light right away or it could take a few tries. If the pericarp "wick" chars rather than lights, then rub a bit of olive oil into it and try again. Once the candle is lit, it burns very cleanly. Although the bottom shouldn’t get hot, you may want to place the candle on a heat-safe surface just to be safe. The candle should go out on its own once the oil is used up, but do not ever leave it unattended.
If desired, clean out the other half of the clementine, cut a hole in the top of the rind, and place on top of the burning bottom half. The hole will ensure that the candle gets enough oxygen. Cutting into the rind is a nice way to add a decorative flair to the project. Also, you may wish to watch a video showing how to make a clementine candle.
-------------
References:
Anne Marie Helmenstine at About.com: Chemistry
http://chemistry.about.com/od/funfireprojects/ss/Clementine-Candle.htm
Kids, a baking soda and vinegar volcano is fun but there are better models for how a volcano actually works. In this activity, wax "lava" forms a volcano in sand, eventually erupting into the atmosphere, which is water in this model. A real volcano forms and erupts because molten rock (magma) and hot gases push up from the Earth's mantle into the crust. This material pushes up through the weakest spot in the crust to be released as an eruption. In this model, wax in the bottom of the cup is heated and becomes molten.
You’ll need a candle as a source of wax (try red or orange wax for realistic lava), sand, water, and a heat-safe clear glass cup or glass.
-------------
References:
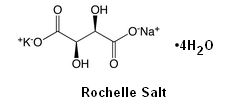
Kids, did you ever hear of a crystal radio kit? More on that in Part II of this activity, but here we will make an essential ingredient. Rochelle salt can be used to grow very large single crystals that exhibit piezoelectricity. This property means the creation of electricity resulting from pressure in the form of mechanical stress. As a result these crystals can be used as transducers in microphones.
Rochelle salt is also called potassium sodium tartrate with the molecular formula of KNaC4H4O6•4H2O. Unless your adult partner works in a lab, you probably don't have this chemical lying around. But you can make it in your own kitchen!
Make sodium carbonate (also called washing soda, Na2CO3) by having your adult partner heat the contents of one half of a box of sodium bicarbonate (also called baking soda, NaHCO3) spread thinly in an oven-safe pan at 275°F for an hour.
Have your adult partner heat a mixture of about 80 grams cream of tartar (KC4H5O6) in 100 milliliters of water to a boil in a saucepan. Remove from heat. One teaspoon at a time, slowly stir the sodium carbonate powder into the cream of tartar solution. The solution will bubble after each addition, so stir until bubbling stops. Continue adding sodium carbonate until no more bubbles form.
Chill this solution in the pan in the refrigerator. Crystalline Rochelle salt will form on the bottom of the pan. Carefully save your Rochelle salt aside for Part II of this activity which will appear in our next edition.
Notes:
1. Use a stainless steel, or better yet, a Pyrex saucepan -- not an aluminum pan to dissolve the cream of tartar. The cream of tartar could leach some metal out of an aluminum pan which might interfer with your experiment.
2. There are some examples of artificial cream of tartar on the market shelves; check the lable to make sure the product you buy is the real thing.
-------------
References:
http://www.ehow.com/how-does_5467738_process-making-piezo-crystals.html
Anne Marie Helmenstine at About.com: Chemistry
http://chemistry.about.com/b/2011/05/05/how-to-make-rochelle-salt.htm?nl=1
Kids, you can make a large single crystal of Rochelle salt and with that make your own piezocrystal-based circuit. You made your own Rochelle salt granules in the July 2012 ChemShorts edition. Piezoelectric crystals make very accurate and stable electronic vibrations. Clocks, radios and computers depend on them for precise timing. The crystal works with other timing elements to produce a stable frequency. Crystals come in a variety of fixed frequencies, from 32,768 to billions of cycles per second.
Rochelle salt, or potassium sodium tartrate, is popular for growing crystals because it results in easily grown single crystals. Take the 80 grams or so of granular Rochelle salt that you made earlier this summer and mix it with 100 milliliters of very hot water.
Filter the solution through a coffee filter, paper towel or filter paper to remove any undissolved material. Allow the solution to sit undisturbed. Small crystals will begin to grow on their own eventually, or you can pour a small amount of solution onto a plate to produce a seed crystal, which may be introduced into a larger volume of solution to grow a large single crystal.
This will yield amateur piezoelectric crystals. This process is easy and is in fact a simplified replica of how professional piezocrystals are manufactured under carefully controlled conditions, with greater temperatures and ingredients of much greater purity.
TIPS: The recipe can be scaled up to create more solution and larger crystals.
-------------
References:
http://www.ehow.com/how-does_5467738_process-making-piezo-crystals.html
A video on making Rochelle salts:
http://www.youtube.com/watch?v=E1Ct3VUWvhQ&feature=related
and testing the crystal:
http://www.youtube.com/watch?annotation_id=annotation_453159&feature=iv&src_vid=E1Ct3VUWvhQ&v=R9m79oWdOZI
This author takes apart a digital watch and uses the piezoelectric crystal near the back of the watch that makes the audible sound for the wrist alarm:
http://www.josepino.com/projects/electricity-from-piezoelectric
and in video: http://www.youtube.com/watch?v=s3Ftl6n9Oq0
They use a small LED to see the output from the crystal. You might try the same with your crystal.
Anne Marie Helmenstine at About.com: Chemistry
http://chemistry.about.com/od/crystalrecipes/a/Rochelle-Salt-Crystals.htm
Kids, how did your friend get that newspaper text on her fingernails? Here you will learn how to do it and why it works. This activity gives new meaning to having the latest information at your fingertips! You will need: pieces of newspaper, top and base coat nail polish, grey/nude/white/light pink colored nail polish, rubbing alcohol (isopropanol, isopropyl alcohol), cotton swabs, and nail polish remover.
Apply a solid basecoat to protect your nails and let it dry thoroughly. Paint your nails with the light nail polish color and again make sure they dry thoroughly. Pour rubbing alcohol into the bottle’s cap or into a small jar. Dip a small piece of newspaper print into the rubbing alcohol for about 5 seconds. Press it firmly on your nail for a few seconds. Peel it off carefully. You'll find that the ink from the newspaper will be left behind. Use a cotton swab and some nail polish remover to clean up your nails. Now apply a topcoat to your nails because, without it, the newspaper will rub off. See the video in the reference below for an on-line tutorial.
Tips. You can also use the comics section, or the horoscope symbols, anything printed on newsprint will work the same. Press the newspaper firmly on to your nail; otherwise, the transferring ink will be incomplete on your nails. Be careful, and consider doing your nails over a newspaper, sink, or towel.
Why does this work? Newspaper ink is made up mostly of soybean oil and carbon black. The isopropyl alcohol helps start dissolving the ink so that it can transfer easily. The isopropyl alcohol dries quickly, and sealing the ink between layers of polish keeps it from rubbing off.
-------------
References:
http://www.wikihow.com/Make-Newspaper-Nails
Thanks to Elizabeth Neis for submitting this idea.
Kids, the “seesaw” candle is a fire science trick that teaches how combustion and Newton's Third Law of Motion work. A candle, balanced between a pair of glasses, seesaws up and down on its own as it burns. The most important thing you’ll need to try this trick is an adult partner. Have them get a long, thin candle, a needle, 2 glasses of the same height, aluminum foil, and watch them do this trick.
First, protect the experiment area with a sheet of aluminum foil. Then, expose the wick at both ends of the candle. If it has some wick pressed onto the bottom of the wax, loosen it. If there isn't any wick then use a dull knife to cut away some wax. Push the needle all the way through the candle about halfway down its length, so half of the needle sticks out either side of the candle. If the candle wax is soft, the needle may push through easily, but if the wax is hard or thick, then grasp the needle with pliers or tweezers, heat it in a flame and push it through the candle. Use the needle as an axle to balance the candle between a pair of glasses. It is okay if one end of the candle is heavier than the other. Your adult partner will then light both ends of the candle. The candle will rock up and down, like a seesaw.
The candle moves in response to forces acting on it, trying to reach equilibrium. The combustion reaction turns the candle wax into carbon dioxide gas and water vapor, making the burning end of a candle lighter. If one side of the candle burns more quickly than the other, the lighter side of the candle moves up. The lower side of the candle is angled such that the flame melts the wax, causing it to drip down. This lessens the mass at that end of the candle, plus the force from the dripping wax actually pushes the end of the candle up! This is Newton's Third Law of Motion, which states that for every action, there is an equal and opposite reaction.
Tips and Safety
This is a fire project, so have an adult perform all of the steps and stay away from curtains, pets, towels... you get the idea. Lighter candles respond more dramatically to changes in mass than heavier ones. You can watch a video of the project.
-------------
References:
Anne Marie Helmenstine at: http://chemistry.about.com/od/funfireprojects/a/Seesaw-Candle-Fire-Magic-Trick.htm
Kids, can you imagine drinking a rainbow? In this example of the principle of density, you can! All that you’ll need is four glasses of the same size, sugar, water, and food coloring.
Put three tablespoons of water into each of four of the glasses. Next add one drop of food coloring to each glass, using a different color for each glass. Then mix in one tablespoon of sugar into the first glass, two into the second, three into the third, and four into the fourth.
Each of the glasses of sugar water will have different densities. The one with the most sugar will be the most dense (thick, or heavy), so use that as your main glass. Slowly and carefully, over the back of a spoon, pour the next-dense liquid (the one with 3 tablespoons of sugar) onto the densest layer. Repeat this careful pouring process until all of the liquids are layered on top of each other, with the least dense layer (one tablespoon of sugar) on top.
Most experiments do this with liquids such as oil, water, alcohol, and cream, because they are easier to keep separate (see ChemShorts Jan 1999 for examples). As you can see during this experiment, though, just using different densities of sugar water is enough. Eventually, through the random mixing of molecules, and unlike oil and water, the different layers here will easily mix, so you have to pour or drink carefully. Still, this is an easily drinkable rainbow — if you have a fondness for sugar.
NOTE: While this may seem like a lot of sugar in one glass if actually consumed, consider that a single can of regular soda has the equivalent of about 10 teaspoons of sugar. (http://wiki.answers.com/Q/How_many_teaspoons_of_sugar_are_in_coke)
-------------
References:
Esther Inglis-Arkell, http://io9.com/5952380/make-a-drinkable-rainbow-in-a-glass; she also describes using Skittles as a colored-sugar source. Many thanks also to Milt Levenberg for this idea.
Updated 10/26/12