 2 circular white coffee filters
 by Kathleen Carrado Gregar, PhD, Argonne National Labs |
Please note: All chemicals and experiments can entail an element of risk, and no experiments should be performed without proper adult supervision.
Kids, do eggshells have tiny holes? This easy science experiment focuses on some of the interesting characteristics of eggs. Prove the existence of a small air pocket inside an egg as well as thousands of small holes in the shell, called pores, all while learning what air does as it is heated.
What you'll need:
• A clear glass or jar, such as Pyrex™, that won't break with the sudden addition of hot water
• An adult partner to handle hot water
• A pan of hot water. It shouldn't be so hot as to be a hazard to work with
• A raw egg
• A magnifying glass
Instructions:
• Place the egg carefully into the glass or jar.
• Carefully pour hot water into the glass or jar until it is nearly full.
• Leave the glass or jar on a table and watch the egg closely for a few minutes; the glass may become hot so be careful.
• Use your magnifying glass to closely examine what is happening.
What's happening?
After surrounding the egg with hot water you will notice tiny bubbles forming on the eggshell which eventually bubble their way to the surface of the water. An egg contains a small air pocket at its wider end between the shell (calcium carbonate) and the egg white (albumin). When the air trapped inside this small pocket begins to heat up, it expands and tries to find a way out of the shell. How does it escape?
They're too small to see under normal conditions, but with the help of a magnifying glass you can see that egg shells contain thousands of small holes, called pores. The pores allow air to pass through the shell, making it look like the egg is bubbling as the air expands and is forced through the shell.
Bumpy and grainy in texture, an eggshell is covered with as many as 17,000 tiny pores. An eggshell is made almost entirely of calcium carbonate (CaCO3) crystals. It is a "semipermeable membrane", which means that air and water can pass through its pores. The shell also has a thin outermost coating called the bloom or cuticle that helps keep out bacteria and dust. Do a Google Images search for "egg shell pores" and you'll be amazed at the images you see.
-------------
References:
http://www.sciencekids.co.nz/experiments/eggbubbles.html
https://www.exploratorium.edu/cooking/eggs/eggcomposition.html
Kids, you can use simple kitchen materials to make a colorful density column. This project uses colored sugar solutions with different concentrations. The solutions will form layers, from least dense, on top, to most dense (concentrated) at the bottom of the tower.
You will need a tall clear glass or jar (even better would be a jumbo test tube or graduated cylinder), pipettes or droppers, sugar, measuring spoons, food coloring or tablets, and 4 small cups.
Fill your cups with 1 cup of warm water and add food coloring. You want a different color for each density (for example blue, yellow, red, and green). Add 2, 4, 6, and 8 tablespoons of sugar to the 1st , 2nd, 3rd, and 4th cups. Label each cup with the amount of sugar added. Stir the water until the sugar is completely dissolved. You may need to supersaturate the sugar water solution to get all of the sugar to dissolve. Place the cup in the microwave for 20-30 seconds to warm the water and dissolve more sugar. Continue stirring until all of the sugar is gone.
Start with the cup with the most sugar (most dense). Using a pipette, dropper or back of a spoon, begin adding a first layer of sugar water to the jar. Carefully drip the next dense layer onto the surface of the first. The best technique is to place the pipette right above the surface of the first layer and against the glass. Slowly drip the next color onto the first. This will take a lot of patience. Go slow. The colors will begin to mix at first and then your original color will start to show. Repeat with the next dense color and the least dense color until you have stacked all of the colors.
What's going on? Density is mass (how many molecules are in an object) divided by volume (how much space an object takes up). As you add sugar to the water, more and more sugar molecules will take over the space, making the water more dense. The cup containing the 8 tablespoons of sugar will be the most dense, the cup with 2 tablespoons will be least dense. With this sugar water experiment, we put the most dense solution on the bottom. Why do you think that is? What will happen if you try it with the least dense solution on the bottom?
TIPS
Supersaturated Solution
If you attempt to dissolve sugar in water, you reach a point where you cannot dissolve any more sugar. This is called a saturated solution. However, if you heat this solution, more sugar will dissolve. When the solution is cooled, the sugar will remain in solution. This is called a supersaturated solution, which is very unstable and will crystallize easily.
Density Column Mixup
What happens if you shake or mix up your sugar density column? The colors will not separate and go back to the rainbow, like a water-oil density tower. The sugar will mix evenly with the water.
Patience
This experiment takes a lot of patience. You won't see the color you are adding right away. Keep carefully dripping the sugar water solution and you will see it begin to stack up.
-------------
References:
Steve Spangler Science: http://www.stevespanglerscience.com/lab/experiments/colorful-sugar-density-tower
Anne Marie Helmenstine: http://chemistry.about.com/od/chemistrydemonstrations/ht/rainbowinaglass.htm
Kids, did you know that a "saline" solution refers to a salt solution, which you can prepare yourself using readily available materials. The solution can be used as a disinfectant, sterile rinse, or for labwork (although not for contact lenses - see a note below about that). This recipe is for a salt solution that is the same concentration as body fluids. The salt in saline solution discourages bacterial growth while rinsing away contaminants. Because the salt composition is similar to that of the body, it causes less tissue damage than you would get from pure water.
Technically, a saline solution results whenever you mix any salt with water. The easiest saline solution consists of sodium chloride (table salt) in water. For some purposes, it's fine to use a freshly mixed solution. In other cases, you'll want to sterilize the solution. Keep the purpose in mind when you mix the solution. If, for example, you are simply rinsing your mouth with saline solution as a dental rinse, you can mix any amount of table salt with warm water and call it good. If, however, you are cleaning a wound, for example, it's important to use pure ingredients and maintain sterile conditions.
You can use pure table salt from the grocery store. It's best to use uniodized salt, which does not have added iodine. Avoid using rock salt (halite) or sea salt; even though these are primarily sodium chloride, there are additional types of salts and other contaminants may cause problems for some purposes. Use distilled water or reverse osmosis purified water rather ordinary tap water. You want 9 grams of salt per liter of water or 1 teaspoon of salt per cup (8 fluid ounces) of water.
As a mouth rinse, you can simply dissolve the salt into very warm water. You may even wish to add a teaspoon of baking soda (sodium bicarbonate).
For a sterile solution, dissolve the salt in boiling water. Keep the solution sterile by placing a lid over the container so that no microorganisms get into the liquid or air space as the solution cools. You can dispense the sterile solution into sterile containers. Have an adult partner sterilize containers either by boiling them or by treating them with a disinfecting solution, such as the type sold for home brewing or making wine. It's a good idea to label the container with the date and to discard it if the solution is not used within a few days. This solution could be used for treating new piercings or for wound care. It's important to avoid contaminating the liquid, so ideally make just as much solution as you need at a time, allow it to cool, and discard leftover liquid. The sterile solution will remain suitable for lab use for several days in its sealed container, but you should expect some degree of contamination once it is opened.
Note: Although it is the proper salinity, this solution is not suitable for contact lenses. Commercial contact lens solution contains buffers that help protect your eyes, plus the solution includes agents to help keep the liquid sterile.
-------------
References:
Anne Marie Helmenstine: http://chemistry.about.com/od/labrecipes/a/How-To-Make-Saline-Solution.htm
Kids, did you know that you can calculate the speed of light using common materials in your kitchen? The speed of light is 299,792,458 meters per second, or 670,616,629 miles per hour. According to an entertaining NPR video from Skunk Bear, the speed of light is easy to calculate using Peeps® and a microwave oven.
First, what are microwaves? Microwaves are a type of radiation and, like all radiation, microwaves are part of the electromagnetic spectrum. “Microwaves” also are kitchen appliances that heat food by exposing them to microwave radiation.
What you’ll need:
Like all waves, microwaves are defined by their frequency and wavelength. How do you determine the frequency of the radiation in your microwave oven? Look at the manufacturer’s sticker and the abbreviations MHz or GHz. (The hertz is the unit of measurement for frequency.) A common frequency value is 2,450 MHz, or 2.45 GHz. This means 2,450,000,000 Hz, or 2,450,000,000 cycles per second.
How do you determine the wavelengths of the radiation in your microwave?
In our calculation the average distance between hot spots was about 6.1 centimeters. So, the wavelength was about 12.2 centimeters.
Now multiply the frequency (2,450,000,000) by the wavelength. You should get pretty close to the speed of light in inches per second or centimeters per second.
Use this site to convert inches-per-second to miles-per-hour: http://www.kylesconverter.com/speed-or-velocity/inches-per-second-to-miles-per-hour
Multiply your answer by .01 to convert centimeters-per-second to meters-per-second. Using our data:
-------------
References:
Many thanks to David Czaplewski of Argonne National Laboratory for making us aware of this experiment.
https://www.youtube.com/watch?v=HwREvdUWSKE
http://blog.education.nationalgeographic.com/2015/04/15/a-peep-into-the-speed-of-light/
-------------
References:
Anne Marie Helmenstine: http://chemistry.about.com/od/labrecipes/a/How-To-Make-Saline-Solution.htm
Kids, did you know that cauliflower also comes in orange and purple colors? And that you can make designs using purple cauliflower and lemon juice? Make a quick trip to the grocery store with an adult partner and find out how!
First, a little science. The deep purple color of purple cauliflower comes from anthocyanins, the antioxidant that gives the purple color to the skins of grapes, plums, and eggplants. Anthocyanin is a harmless, water soluble pigment and so purple cauliflower is perfectly safe to eat.
pH is a measure, used by chemists, of the strength of acids and bases. Anthocyanins can be used as pH indicators because their color changes with pH; they are pink in acidic solutions (pH < 7), purple in neutral solutions (pH ~ 7), greenish-yellow in basic solutions (pH > 7), and colorless in very basic solutions. You may have heard of red cabbage as pH indicators because, not surprisingly, they also contain anthocyanins.
Have an adult partner steam some purple cauliflower in a steam basket on the stove, and collect the dark blue/purple water after it cools. Pour equal amounts of the cooled purple water into a few clear glasses. Add a teaspoon of cream of tartar (tartaric acid) to one glass and stir. Add a teaspoon of baking soda (sodium bicarbonate) to another glass and stir. Add some lemon juice (citric acid) to a glass and stir. What happens? Find other items around your home and test them using your cauliflower indicator to determine whether they are acids or bases.
To some uncooked, raw purple cauliflower, add some drops of lemon juice. What happens? Here is where you can get creative and make some interesting designs in your vegetables.
Heating the purple florets will also change their color from purple to gray or slate blue, especially if your water is hard or has an alkaline pH. You could add a bit of vinegar or cream of tartar to the water to minimize the color change.
Many thanks to Antonya Sanders for the tip!
-------------
References:
http://www.gardeningknowhow.com/edible/vegetables/cauliflower/purple-tint-on-cauliflower.htm
First you need to draw a perfect Isosceles Trapezoid shape on the graph paper. The dimensions are 1 cm x 3.5 cm x 6 cm. Next, take off the sides of the CD case, place the trapezoid template on top, and have an adult partner cut out the shape with the box cutter. Once the first trapezoid is cut out, your adult partner can use this as a template to cut out three more just like it. This is difficult to cut and takes some skill. As an alternative, there is a link to buying a pre-made reflector (http://www.ebay.com/itm/181835509279).
Fasten the four plastic trapazoid shapes together in an open pyramid-shaped vase using some tape (glue doesn't work well); tape the 3.5 cm sides together. To start projecting images, you'll need to load hologram-specific videos from YouTube, and Mrwhosetheboss links to a few of these on his YouTube page. For example, for blue jellyfish go to https://www.youtube.com/watch?v=FounIsUgNjg
Place the phone flat on the table, load the video, and place the pyramid vase on top. Turn off the lights and you'll see a full, 360-degree animated visual from the side, level with the table. Here's a video of the construction.
A hologram is a photographic recording of a light field. The hologram itself is not an image. It is an encoding of the light field as an interference pattern. When suitably lit, the interference pattern diffracts light into a reproduction of the original light field and the objects that were in it appear to still be there. Holography should not be confused with other 3D display technologies, which can produce similar results but are based on conventional lens imaging.
-------------
References:
http://www.sciencealert.com/watch-how-to-turn-your-smartphone-into-a-3d-hologram
https://www.youtube.com/watch?v=7YWTtCsvgvg
Kids, did you know that October 19-24 is National Chemistry Week? This year's theme is "Chemistry Colors our World" and here is one of their activities. Read to the bottom for a bonus activity for Halloween!
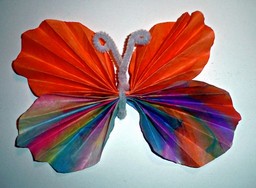
Some artists use the absorbent property of canvas to create interesting shapes and patterns. In this activity, painting with water over marker designs on coffee filters will produce different shapes and artistic butterflies. You'll need:
2 circular white coffee filters Directions:
The filter is made of a special type of paper that absorbs water easily. Paper towels are made of a similar type of paper. The colors in the markers dissolve, or are soluble in, water. When the water is painted onto the coffee filter, the colors dissolve in the water. As the paper filter absorbs the water, the dissolved colors move with the water and create the resulting color patterns.
-------------
References:
http://www.acs.org/content/dam/acsorg/education/resources/k-8/science-activities/arttoys/marker-butterflies.pdf
BONUS: Gather a few empty toilet paper rolls. Have an adult partner carefully cut two slits into each roll to look like eyes when the roll is held horizontally. Vary the size and shape of the eyes; scary, spooky eyes are best for Halloween. Wait for nighttime. Activate and place a small differently-colored nightstick into each roll. Place the rolls around your yard and have your friends walk by. Boo!
Kids, in a variation of Dancing Raisins (ChemShorts for Kids, Feb. 1992; http://chicagoacs.org/articles.php?id=30), let's make some colorful Dancing Worms!
You'll need gummy worms, baking soda (sodium bicarbonate), water (H2O), vinegar (dilute acetic acid), 2 glasses, and scissors.
With an adult partner's help, use the scissors to cut the gummy worms in half or into quarters lengthwise. You want long, thin strips of worm. Drop the worm strips in one glass. Add a couple of spoonfuls of baking soda and enough water to dissolve some of the baking soda. If all of the baking soda dissolves, add more until some undissolved powder remains. Let the worms soak in the baking soda solution for 15 minutes to half an hour.
Pour vinegar into the other glass and drop a baking-soda-soaked worm into the vinegar. What happens? At first, nothing much. But after a while bubbles start to form on the surface of the worm. Then the worm starts to move. After some time, the reaction stops and the worm slows down and stops moving entirely.
Why Do the Worms Move? The gummy worms wriggle because a chemical reaction between sodium bicarbonate and acetic acid produces carbon dioxide gas. The tiny gas bubbles released by the reaction stick to the body of the gummy worms, eventually merging into bubbles big enough to float part of the worm. If the gas bubble detaches, it floats to the surface while that part of the gummy worm sinks back down.
Tips for Success
If your worms never dance then have an adult partner cut them thinner. A thinner gummy worm is a lighter gummy worm and thus much easier to make move. Thin worms absorb baking soda better, too. Or you can try adding more baking soda to the soaking solution or soaking the worms longer. The baking soda needs to get into the gelatin that makes up the worms so that it can react with the vinegar to make bubbles.
-------------
References:
http://chemistry.about.com/od/chemistryactivities/fl/Frankenworms-Dancing-Gummy-Worms-Science-Experiment.htm
Kids, how can you trap colors inside ice? In this melting ice experiment you'll make a colorful ice sculpture while learning about freezing point depression and erosion. You can use many types of salt for this project. Table salt (sodium chloride, NaCl) is fine, as are coarse salts, such as rock salt or sea salt. And other types of salt, for example, Epsom salt (magnesium sulphate heptahydrate, MgSO4·7H2O), works well too. It's a lot of fun to use food coloring, water colors, or any water-based paint like tempera; you can use liquids or powders, whichever you have handy.
First, make some ice. You can use ice cubes for this project, but it's nice to have larger pieces of ice. Freeze water in shallow plastic containers, such as disposable storage containers for sandwiches or leftovers. Fill the containers only part way in order to make relatively thin pieces of ice.
Keep the ice in the freezer until you are ready to experiment, then remove the pieces of ice and place them on a cookie sheet or in a shallow pan. If the ice doesn't want to come out you can use warm water around the bottom of the dish to loosen it.
Sprinkle salt onto the ice or make little salt piles on top of the pieces of ice. The salt can melt holes all the way through thin pieces, making interesting ice tunnels. Experiment! Then dot the surface with coloring. The coloring doesn't color the frozen ice, but it follows the melting pattern. You'll be able to see channels, holes, and tunnels in the ice, plus it's eye-catching. You can then refreeze your project to enjoy again at a later time.
This is a messy project best performed outdoors or in a kitchen or bathroom. The coloring will stain hands and clothes and surfaces so have an adult partner around to help keep surfaces clean.
Why Does Salt Melt Ice?
You know that you can sprinkle salt on an icy road or sidewalk to help keep it from becoming icy. Take a look at freezing point depression to understand how it works. Salt melts ice essentially because adding salt lowers the freezing point of the water, that is, the salt water needs a temperature lower than 32°F (0°C) to stay frozen. How does this melt ice? Well, it doesn't, unless there is a little water available with the ice to dissolve the salt and make salt water. You don't need a lot of water to start the process. Ice typically is coated with a thin film of liquid water, which is all it takes.
Pure water freezes at 32°F (0°C). Water with salt will freeze at some lower temperature. Just how low this temperature will be depends on the salt used and how much salt is dissolved in the water. If you put table salt on ice at 15°F, the salt will be able to prevent melting ice from re-freezing. Magnesium chloride works down to 5°F while calcium chloride works down to -20°F. If the temperature gets down to where the salt water can freeze, energy will be released when the liquid changes state and becomes a solid. This energy may be enough to melt a small amount of the pure ice, keeping the process going.
As a bonus effect, the ice exposed to the salty water melts faster than other ice, so holes and channels form. Think about erosion in geology and the geological shapes formed by running water.
-------------
References:
http://chemistry.about.com/od/chemistryactivities/a/Melting-Ice-Science-Experiment.htm
Editor, Dr. Kathleen Carrado Gregar, Argonne National Laboratory
Updated 12/13/15