Paul Brandt, PhD, North Central College |
Please note: All chemicals and experiments can entail an element of risk, and no experiments should be performed without proper adult supervision.
Have you ever seen a can crushed? How about one that has been ripped apart? Crushing an aluminum can may not take that much strength but ripping one apart would be very difficult to do. That is unless you’ve had a little chemical help.
Materials:
Please note: All chemicals and experiments involve an element of risk, and no experiments should be performed without proper adult supervision.
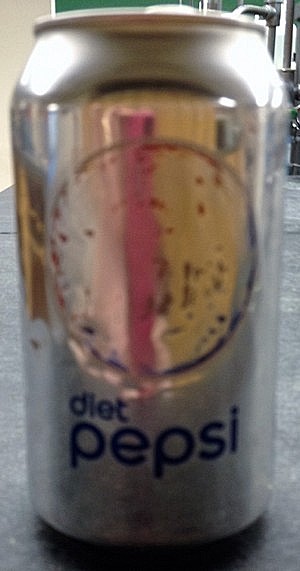
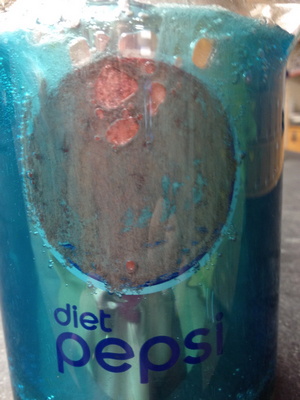
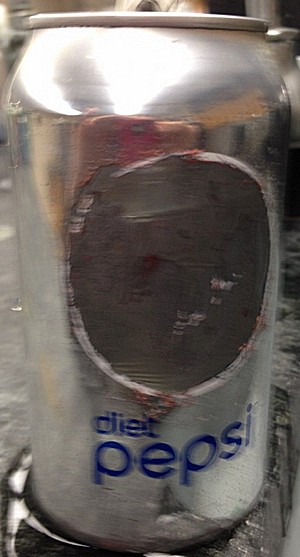
Using the sandpaper, remove two squares of paint about the size of the UPC symbol (I have used a Dremel tool to remove the paint much more quickly) – see picture A. Do this on opposite sides of the can. The paint protects the aluminum underneath it so that the aluminum does not easily react with other things. The bottom of the can does not have paint and will be eaten away by the copper solution so you may want to put some plastic wrap around the bottom secured with a rubber band. Fill the can with water and place it inside the glass or plastic container. Pour some copper sulfate into the glass or plastic container on the outside of the pop can – see picture B. Normally this reaction happens much faster if you use copper chloride but if that is not readily available you can simply add some salt to the copper sulfate. In a short period of time you will begin to see the blue translucent solution turn murky and some brownish red solid begin to appear. You will also see some gas evolved. After about 30 minutes you can remove the can from the container and you will notice a thin film holding the water inside the can – see picture C. Be careful with how you handle the can because the plastic liner is easily broken.
| Picture A | Picture B | Picture C |
|
|
|
It turns out that aluminum is really quite reactive and so to protect the can from other things we put paint on the outside of the can and a plastic liner to protect the inside of the can. It is believed that the chloride from the salt is necessary to start etching away at the oxide pits on the surface of the metal. Once the pure aluminum is exposed, the copper ions will oxidize the aluminum metal to colorless aluminum ions while the blue copper ions get reduced to brownish red copper metal. The aluminum ions are washed away into the solution leaving nothing behind but the plastic liner.
To set up the can to be able to rip it in half, this can be done in two ways. You can score the can on the outside so that you take away the paint. However, this will deface the can on the outside and you will notice that something is amiss with the can. On the other hand you can score the can on the inside so that you remove a thin line of the plastic liner on the inside of the can and when the aluminum is eaten away by the copper ions, it will leave only the paint holding the two halves of the can together.
Waste:
If there is any blue remaining in the solution, add some aluminum foil until the blue disappears. The metal can and the solid copper can be thrown into the trash can. The colorless solution can go down the drain with lots of water.
To see how you can set up a can to rip it apart, see the following video.
https://www.youtube.com/watch?v=BK0x5v0Kb7A
-------------
References:
This experiment is referred to in the October 1993 ChemShorts article titled "Aluminum Trivia"
http://chicagoacs.net/archive/ChmShort/CS93.html#10.93
Here’s the challenge: Fill a glass with water as full as you can without it spilling over. How many paperclips do you think you can add before the water spills over the rim of the glass?
 You will find that you can add a whole lot of paperclips before the water overflows. Challenge your parent, sibling or friend to the same experiment but for theirs add a drop of dishwashing soap (but don’t let them see you) before they start adding the paperclips. They will find that they are not able to add nearly as many paperclips as you were.
Water is one of the most polar liquids that we know of. What does that mean and why is that important? Water has a positive end and a negative end, not unlike a magnet. What happens when you put a bunch of magnets together? They all stick together. Water is like that – it’s like the water molecules are holding hands and the water molecules at the surface aren’t letting go of their partners and keeping them from falling over the edge. This is called cohesion. By adding the drop of soap to the water, you break some of that cohesion and the water has less surface tension.
-------------
References:
http://www.kids-fun-science.com/water-experiments.html
This experiment is related to the June, 2006 Chemshort, "Pepper Tension"
As a kid doing dishes (does anyone do those anymore?), I was always fascinated when I had a glass filled with water and if you put a small plate on top of it and tipped it over, the water would stay in the glass. Back then it never made sense to me how this happened.
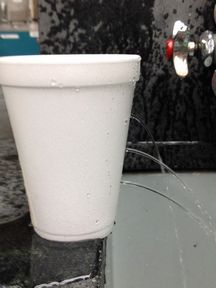
Push the paper towel to the bottom of the glass and push the cup, upside down, into the water. Does the paper towel get wet? Why not?
Remove the towel and place the peanut on top of the water. Push the open end of the glass down over the peanut. Did the top of the peanut get wet? Why not?
Place the cup in the water so that it fills and turn it upside down. Lift the glass slowly. Is it tough to pull out of the water? Did the water stay in the cup until the lip of the cup broke the surface of the water allowing the air in?
Fill the cup with water and put the cardboard on top of the glass and holding the cardboard on, turn the glass over and let go of the cardboard. Did the cardboard stay on? What happens if you don’t fill the cup all the way and do the experiment again? Try filling the cup to different levels.
Why didn’t the paper towel get wet? You may have noticed that the water level in the glass actually got pushed down relative to the water in the sink/tub. What pushed the water down? It was the air that was trapped in the glass. Although we can’t see air, we know it is there because we see its effects around us. We need it to breathe and we can see it move the leaves in the trees when the wind (moving air) is blowing. This also explains why the top of the peanut did not get wet. The air pushed the water down.
Why did the water stay in the cup till it broke the surface? Air molecules have mass and they are moving very fast hitting everything around us (they are travelling at about 1000 miles/hr!). The pressure that the air pushes on everything is about 15 pounds per square inch (about the weight of a bowling ball pushing on every square inch of your body!). That’s a lot of pressure pushing on us as well as the surface of the water in the tub/sink, and that pressure is what is keeping the water in the glass. If you were to poke a hole in the bottom of the glass, the water would not stay in the glass; you’ve done this experiment before when you trapped a liquid in a straw with your finger and then released your finger from the end of the straw to let the liquid flow out.
Why didn’t the cardboard fall off? Because the air molecules are travelling in all directions they are also pushing up on things as well – like the cardboard. A typical cup opening might be 10 in2 so it has 10 in2 x 15 lbs/in2 = 150 lbs of pressure pushing up on the cardboard, and so it would require 150 pounds of water above the cardboard pushing down on it in order for the cardboard to come off. That would require a very tall glass!
-------------
References:
http://www.giftofcuriosity.com/3-air-pressure-activities-for-kids/
 Materials:
A) Begin by pushing the pen into the cup about 1 inch from the bottom and follow with two more holes, each 1 inch above the previous one. Above the sink or a tub, plug the holes with your fingers and pour water into the cup. Release your fingers from the holes and notice the water coming out of the holes. You can also see a similar effect if you close off the top two holes with your fingers and then take your fingers off the holes.
B) The following step might work better outdoors. Make those holes bigger by pushing the pencil through those holes. Again, plugging those holes with your fingers and filling the cup with water, allow the cup to drop to the ground. Pay close attention to the water while the cup is falling, and where it comes out of the cup.
C) Fill the water bottle with water and cap it. Using the push pin, make several small holes in the bottle (anywhere you like). Notice what happens to the water if you leave the bottle alone. What happens if you open the bottle?
A) For the first experiment you may have noticed that the water coming out of the bottom hole squirts farther than from the middle hole and that water squirts farther out than from the hole on top. Because the water pressure is greatest on the bottom, it will push the water out with greatest pressure on the bottom and the water on top may just dribble out of the top hole. If you closed off those top two holes and then released them, you may have seen the water decrease its flow out of the bottom hole because the water pressure is greatest when there are fewer holes for the water to come out of.
B) In the second experiment, the water doesn’t come out of the holes at all because the water comes out of the holes as it tries to get to the Earth’s surface due to gravity. But if the water is already falling because of gravity as you release the cup, there is no incentive for it to pour out of the holes so it just stays in the cup (till it hits the Earth).
C) Lastly, water stays in the bottle if the lid is on because there isn’t enough pressure to push the water out. Once you open the lid, air molecules can enter into the top of the bottle and create extra pressure to push the water out. If you seal the bottle again there will soon be too little air to push more water out again. If you pick the water bottle up by the neck you can move it around with no water coming out but if you pick the bottle up by the flexible plastic, you will probably squeeze the bottle wall a bit as you hold it, creating pressure inside the bottle and water will come out of the holes.
What is a bath bomb and why does it fizz when it goes into water? A bath bomb is a solid, powdery substance which can take many shapes. Here is one pictured below.
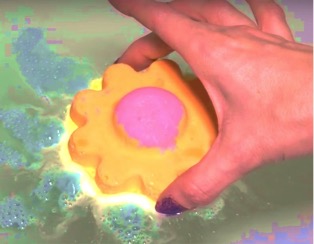 As it's submerged in water, it bubbles. This is the result of the release of CO2 also known as carbon dioxide. This is the gas you breathe out. The release of this gas occurs because of an acid-base reaction. Although we tend to think of acids as scary, many foods we eat are acidic, such as lemons or tomatoes. The acid and base found in a bath bomb are weak and will not hurt your skin. Here is the balanced equation:
3 NaHCO3 + C6H8O7 -> CO2 + 3 H2O + Na3C6H5O7
Sodium bicarbonate (NaHCO3), also known as baking soda, reacts with citric acid (C6H8O7). In the foods you eat, citric acid is often used as a preservative or as a flavoring agent. Baking soda would be considered the base in this reaction. You can guess that the citric acid is, of course, the acidic component. The products (what forms at the end of the reaction) are carbon dioxide, water, and sodium citrate. Sodium citrate (Na3C6H5O7 ) is also commonly found in the foods you eat.
You might be wondering, how can these ingredients be together in a bath bomb and not react until water comes into the picture? Chemicals are often most stable as a solid. Therefore, water allows the acid and base to react with each other.
Bath bombs are cheap and easy to make. All of the ingredients are safe to handle which makes it fun for people of all ages! Here is an ingredient list and procedure on how to make them:
Materials:Experiment:
Oil is necessary to help bind the ingredients together. This also helps moisturize your skin. If you have allergies to coconut oil, it can be substituted using ingredients such as almond oil, sunflower oil, or shea butter. The cornstarch and Epsom salts prevent excess moisture from activating the acid-base reaction.
If proper soap dye is used, there should not be any bath stains. Food coloring can work as well. Essential oils or spritz of fragrances can help scent the bath bombs. As a note, citric acid can often be found at local grocery stores in the spice aisle. Also, to form the bath bombs, soap molds can be purchased at arts and crafts stores.
If you happen to use a bath bomb, don't forget to still use soap in your bath since this is not a soap-containing product! Due to the product being a solid, it will last a long time if kept in a dry area. Bath bombs are exciting to make and use, and you can even make them as a gift for someone. Experiment with different quantities of ingredients and see how it affects the bomb. Have fun and play around as a formulating chemist!
Contributed by: Amanda Rountree, North Central College
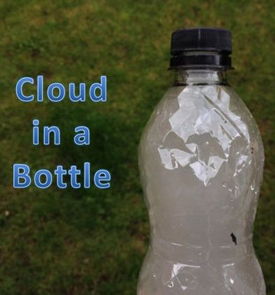
Have you ever laid out in the summertime looking up in the sky at the clouds and imagined what animal shape the cloud has made? What is a cloud and can I make one?
Warning! When using matches make sure there is an adult to help.
 Experiment:
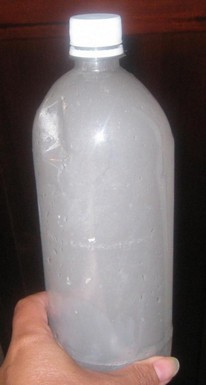 Add a small amount (a teaspoon or so) of the warm water to the bottle. Squeeze the bottle a bit with the lid off and have an adult light a match and gently blow out the match as it sits in front of the opening of the bottle. Release the pressure on the bottle to try and draw some of the smoke into the bottle. If no smoke goes in, you can drop a freshly blown out match into the bottle and tightly cap the bottle. Squeeze the bottle multiple times.
You’ll notice that as you squeeze the bottle that the bottle is completely transparent but that when you release the pressure a cloud is formed. Clouds are tiny droplets of water molecules in the air. They are formed when moist warm air rises into the atmosphere and as the air rises it cools, causing the water vapor to form those tiny water droplets. When you squeeze the bottle you cause the air in the bottle to warm slightly and when you release the pressure in the bottle, the air cools. So why are the matches needed? The clouds also need a small surface of something for the water molecules to form onto. This might be salt particles from the ocean spray or other pollutants in the air. The smoke from the match gives those tiny water particles a surface to condense onto inside the bottle.
Greater pressures can be created by using a pump but that will take more work!
-------------
References:
http://www.physics.org/interact/physics-to-go/cloud-in-a-bottle/
Editor, Dr. Paul Brandt, North Central College
Updated 7/30/17