by Kathleen Carrado Gregar, PhD, Argonne National Labs |
Please note: All chemicals and experiments can entail an element of risk, and no experiments should be performed without proper adult supervision.
Kids, making maple syrup crystals is a fun project! They are an alternate flavorful sweetener in drinks or other treats because maple syrup crystals have a more complex flavor than sugar crystals or rock candy. Here are two methods for making maple syrup crystals. Note you must use pure maple syrup and not one of the popular commercial brands made with high fructose corn syrup and molasses.
Method 1
Have an adult partner heat a cup of pure maple syrup in a pan over medium heat. They need to stir and heat the syrup until it starts to thicken or crystals are seen forming on the bottom or side of the pan. Your adult partner will then pour the syrup onto a chilled plate and allow the syrup to crystallize. If a dark-colored plate is used then it will be easier to watch the crystals form.
Method 2
Cover a baking sheet or shallow dish with a scant 1/4” layer of water. Freeze the dish to make ice. Have an adult partner heat maple syrup as above, and remove the pan from heat. Remove the dish of ice from the freezer. Then your adult partner can drop spoonfuls of the hot syrup onto the ice. The sudden temperature change will cause crystals to form within minutes.
Maple syrup is a mixture of sugars, water, and minerals. In addition there are small amounts of organic acids, amino acids, proteins, phenol compounds and even a few vitamins. The variation in the latter ingredients gives maple syrup the broad spectrum of flavors from different suppliers (this is similar to honey).
At 66°Bx* the sugar is completely in solution and it is a stable solution. When heated, the concentration of sugar increases as water is lost. The sugar remains in solution at the higher temperature even though much of the water boils away. After heating, there is more sugar than can remain in solution at lower temperatures. The solution is said to be super-saturated. Agitation or stirring can cause the sugar to crystallize and come out of solution until the sugar in solution reaches a stable concentration for its temperature. The fact that sugar solidifies into crystals is extremely important in making confections.
Controlling crystallization is quite tricky and depends on temperature and time. You might try both methods above to see if the crystals appear different to your eyes.
* Bx is the abbreviation for Brix, a measure of the sugar concentration by weight in an aqueous solution. So 66 degrees Brix means that 100 grams of solution would contain 66 grams of sugar.
-------------
References:
http://chemistry.about.com/od/sugarcrystalsrockcandy/a/Maple-Syrup-Crystals.htm
Cornell Maple Bulletin 202 (2007) by Stephen Childs (attached)
Kids, Valentine’s day is right around the corner and the people who sell flowers look forward to this day all year long. If you think about the colors of flowers you think of red, yellow, orange, pink, and white but other colors of the rainbow are not prevalent like green and blue. Here is a way to make some of those colors appear in a flower.
You will need some white flowers and carnations work well – really any stemmed plant will work.
First, trim the flowers at the stalks. Fill a vase or jar with water and add some food coloring of your choice (green or blue?). Put your flowers in the water and wait. Usually you can see effects within a few hours!
The science:
The reason this happens is because of something called the transpiration stream. This is the movement of water up the stem of a plant from root to leaf when water is lost from the plant due to evaporation occurring at the leaves. Firstly water is absorbed by the root and moves through root hair cells via the process of osmosis. It then moves into the xylem vessel which is the tube that carries the water up the plant. Plants are not like us with pumping mechanism that pushes our blood around, so water moves up the vessel by adhesion (being attracted to the side of the vessel) and cohesion (water molecules being attracted to each other – think of water molecules as people who are holding hands and as one person climbs up the side of a wall, they pull another along with them). Therefore when water evaporates from the top of the leaves it changes the pressure in the vessel and pulls up the column of water to replace the water lost.
The best way to consider this is to imagine you have a thick shake – the straw can’t carry the shake up, but if you withdraw air from the top, you change the pressure and force the liquid shake up the straw where there is less pressure. It moves in a column because the molecules are attracted to each other.
This is similar to a ChemShorts article, "Totally Tubular Plants", from August 1993.
-------------
References:
http://www.science-sparks.com/2011/09/26/changing-colour-flowers-with-transpiration/
This article contributed by Paul Brandt
March 2016
Kids, this is an experience that you may have noticed before, particularly if you go swimming in the summer. Fish take advantage of this principle in the winter time.
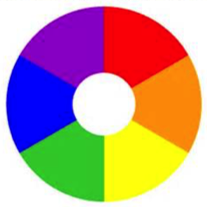
Many of you have experienced density before and you may have referred to it as “Sink or Float”. Now you’re comparing hot water to cold water. When you allowed the water to mix with the hot on top of the cold did anything happen? How about when you had the cold on top of the hot? Did you find that the cold water sank to the bottom? You should also have noticed that the two colors mixed nicely in one case but not in the other. If you mixed yellow and blue you should have obtained a green mixture. You can use a color wheel to help you determine which color you get. You should get a color in between the two colors that you mix.
You may have noticed that the hot water dispersed the food coloring faster than the cold water did. The reason for this is that hot things have molecules with lots of energy and motion while those that are cold have little energy or motion. The more motion in the molecule, the faster things should mix. If the two sets of cups sat long enough, would they eventually look the same? Try it out!
At the opening it was stated that you may have had this experience while swimming. If you dive into the deep end of the pool you may have noticed that the temperature of the water changes to colder temperatures the deeper you go. Part of the reason for this is that the cold water is more dense than the hot water. The other reason is that the sun puts its energy into heating up the water on the top. Fish use this principal in the winter because the oxygen that they breathe is dissolved in the cold water. Since their pond might be frozen over, the fish have to go to the bottom of the pond where it is colder to get their oxygen.
This is similar to another ChemShorts article on density using sugar to increase the density: "Rainbow in a Glass": from December 2012
-------------
References:
Esther Inglis-Arkell, http://io9.com/5952380/make-a-drinkable-rainbow-in-a-glass; she also describes using Skittles as a colored-sugar source. Many thanks also to Milt Levenberg for this idea.
This article contributed by Paul Brandt
Kids, this is a demonstration of what occurs in the ocean and what would have occurred in the formation of some islands like Hawaii. This was inspired by the “3 Scientists Walk into a Bar” Facebook page: https://www.facebook.com/3Scientists/videos/614648762010171/
You will certainly want the help of an adult with this.
The sand represents the Earth’s crust and the water symbolizes the ocean, while the wax is like the molten magma (or lava once it escapes the Earth’s crust). Magma is a liquid because it resides below the Earth’s crust in the mantle of the Earth where the temperatures can be on the order of 700ºC to 1300ºC.
As the wax melts it pushes up against the "Earth’s crust" and eventually creates a fissure or crack in the crust through which it can rise. The water (once it cools) will allow the liquid “lava” to cool and solidify. The “island” that you created is probably floating on the water. This would not be the case in the middle of the Pacific Ocean. As soon as the lava hit the cold ocean water it would cool and solidify and the island would be built up from the fissure all the way to the ocean’s surface.
This article contributed by Paul Brandt
Kids, back in 2010, we looked at the reaction of iron in steel wool with oxygen by combining the wool with vinegar to remove the protective coating on it and saw the temperature rise as the wool is wrapped around a thermometer. The temperature went up because of the reaction of the steel wool with the atmospheric oxygen.
Now that camping season is upon us, we can take advantage of this very hot reaction to help us make our campfire. You know that when starting a campfire, it is often best to have some very small twigs or dried leaves to get the fire started because logs don’t catch fire easily. We’ll take advantage of the very fine steel wool for the same reason – the small twigs and the steel wool both have a lot of surface area for the reaction to take place.
Please note: All chemicals and experiments involve an element of risk, and no experiments should be performed without proper adult supervision. This experiment can create a fire, so it is particularly important that an adult be present to supervise this activity.
Did you see the sparks in the wool? If you’re looking to start a campfire you will want some tinder nearby to get the fire started. Blowing on the sparks will allow them to travel through the wool more completely.
By touching the leads of the battery to the wool, you complete the circuit of the battery. Electricity will begin to flow through the wire (just like in an incandescent light bulb). As electrons flow, friction is created and the fine wire heats up and the iron is able to react with the oxygen in the atmosphere, making it even hotter, until it actually catches fire. Blowing on it keeps oxygen coming to the wire for the reaction to continue. Larger iron blocks will not catch fire because the iron does not have enough oxygen around it and the iron cannot get hot enough because the heat can too easily disperse to deep inside the block of iron. There is not enough surface area in the block of iron.
The wool may also have a bit of an oil residue on it and that oil will also combust. The reaction that is occurring is:
4 Fe + 3 O2 -> 2 Fe2O3
Although it may not seem like it, the mass of the combusted wool should be significantly more than the mass of the initial wool because it has added to it the mass of the oxygen from the atmosphere
This article contributed by Paul Brandt
Have you noticed that packing peanuts look different? Sometimes they are different colors (but that’s just because they add some color to the material in the peanut). The ones that are really different exist because they are made out of two very different materials. The original peanuts were made out of polystyrene. Polystyrene, or styrofoam, is a polymer, a molecule made up of lots of smaller styrene molecules. Styrene is made from petroleum oil meaning that it is made from carbon and hydrogen atoms. The newer peanuts are made from starch and consist of atoms of carbon, hydrogen, and oxygen. Starch is also a polymer made up of many glucose, or simple sugar, molecules. How can we tell the difference between these two?
Please note: All chemicals and experiments involve an element of risk, and no experiments should be performed without proper adult supervision.
Materials: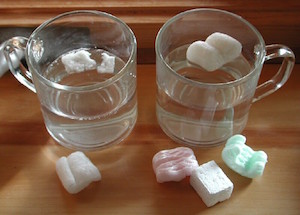 Look closely at the peanuts and see the difference between them. You will notice that the styrofoam is a smooth peanut while the starch peanut is rougher on the edges. There is a more fun way to see the differences however. Place the peanut in some water. The styrofoam peanut will float and not interact with the water at all whereas the starch peanut will float but will also slowly begin to dissolve and get all sticky. This is because the oxygen and the hydrogen in the starch form interactions, called hydrogen bonds, with the water molecules. These interactions are strong enoughally likes to surround the starch molecule which is the beginning of dissolving the starch. On the that the water re other hand, water really doesn’t like to surround carbon-hydrogen bonds and so it repels the styrofoam peanuts. Now try the peanut in some fingernail polish remover. You will notice that the styrofoam peanuts really like to be surrounded by the acetone molecules in the fingernail polish remover, much more so than the starch peanuts. Look closely and you will see bubbles escaping the styrofoam peanuts as the peanuts dissolve into the acetone. The bubbles arise from the trapped air in the peanuts and is what makes them so good for packing. The air makes the peanuts very light and squishy so that they can absorb the shock when a package is dropped. It is amazing how many of the Styrofoam peanuts will go into the small amount of fingernail polish remover.
If you pour off the liquid from the melted styrofoam and put the melted styrofoam on some aluminum foil and allow it to dry you will notice that the polymer changes the way it feels. Make sure you allow the liquid to evaporate outside. It is now a hard plastic more similar to other polystyrene polymers like CD cases and plastic tableware. Other polystyrene polymers have a recycling code number “6”.
If you are interested in the environmental aspects of the peanuts and are looking to compost or recycle them, please visit http://www.arttec.net/SustainableLiving/index.html and see the short article on Packing Peanuts about 3/4 of the way down the page.
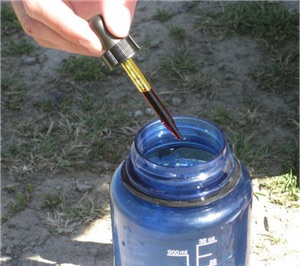 I just got back from the Illinois State Fair where the ACS had a science tent. Frank Salter did many of the demonstrations at the Fair and shared this one with me. Apparently back during the Vietnam Conflict, our troops did not always have access to clean, pathogen-free water. To remedy this they were given either iodine tablets or a tincture of iodine (this is merely iodine dissolved in some amount of ethyl alcohol). The iodine is a good oxidizing agent and will oxidize, and thus kill the bacteria and viruses. Of course, since iodine is a yellowish brown color and it does not have a particularly pleasant taste, they would want to remove the iodine, and they were able to do so with Vitamin C tablets – a good antioxidant.
Please note: All chemicals and experiments involve an element of risk, and no experiments should be performed without proper adult supervision.
Materials:Normally in order to disinfect the water you would only add 5 drops of the iodine to a liter of water, but we want to see a dramatic change so add about 20 drops (1 mL) or so of the iodine solution to the water. You will see that the water has a very unappealing color and odor to it. Mix the solution. Normally to disinfect the water you would want to allow the iodine to react with the bad elements for about 30 minutes but since we don’t plan to drink the water, we can simply add the vitamin C tablet right away. Stir the solution. After a bit you should notice that the water becomes crystal clear with no bad odor or taste. Additionally now, if you were a soldier in Vietnam and had to drink the water, you would get your daily dose of vitamin C!
The chemical reaction is as follows:
C6H8O6 + I2 -> C6H6O6 + 2I- + 2H+
Another ChemShorts article (October 1999) CS99.html#10.99 used this same chemistry to determine how much vitamin C is in Tang® drink mix or orange juice.
After taking last month off of writing ChemShorts for Kids, I thought I’d add another little trick from the Illinois State Fair that Frank Salter shared with many attendees.
Materials:
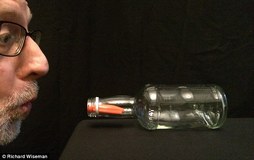 Rest the pen cap inside the bottle at the opening as you hold the bottle horizontally. Although you can put the cap in either direction, most put it in such that the cap opening is pointed to the outside. Now try to blow the cap into the bottle. What happened and how do you explain it?
Although there is not much chemistry in the demonstration, it can be explained with a little physics called the Bernoulli Principle. This states that a slow moving fluid (air in this case) exerts more pressure than a fast moving fluid. As you blow into the very narrow opening, the air moves quickly around the cap and into the large opening. Since this is a confined space and the air must come back out again, the greater pressure is that coming from the slow moving air back out of the bottle.
Make a funnel out of a piece of paper and see what happens when you put the pen cap in the wider end and blow into the pen cap. Try putting the pen cap in the narrow end. Can you explain what happened here?
Updated 7/29/17